5. intra-mart Accel Platform をセットアップする
intra-mart Accel Platform システム管理者 向けの作業です。
intra-mart Accel Platform のセットアップは「intra-mart Accel Platform セットアップガイド」を参照してください。
ここでは追加で必要な手順を説明します。
項目
5.1. モジュールの選択
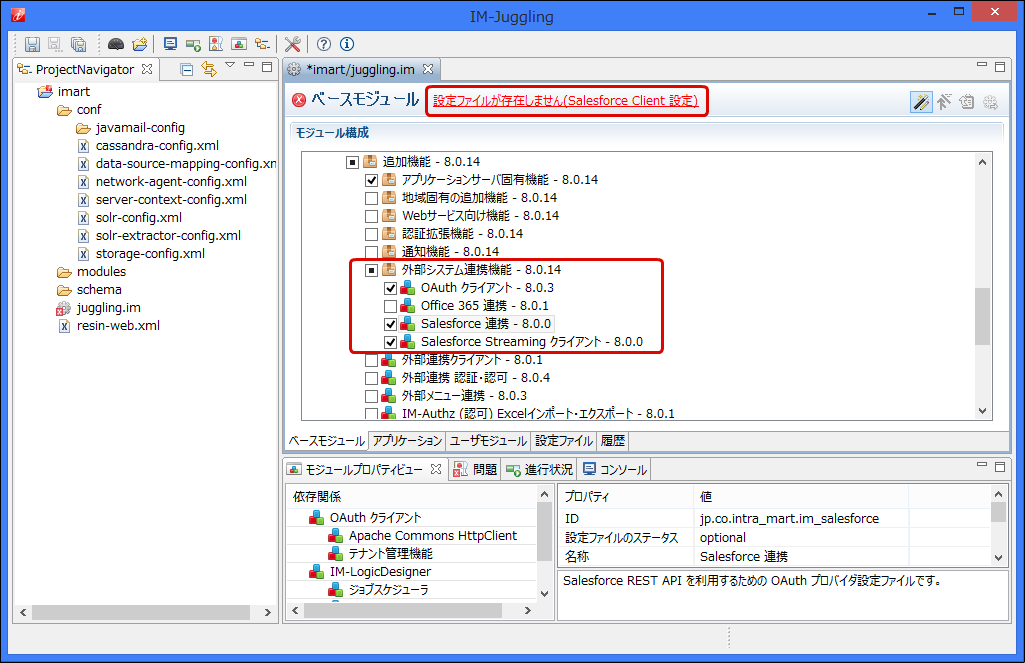
「intra-mart Accel Platform セットアップガイド」-「プロジェクトの作成とモジュールの選択」より、Salesforce 連携 、OAuth クライアントを選択します。
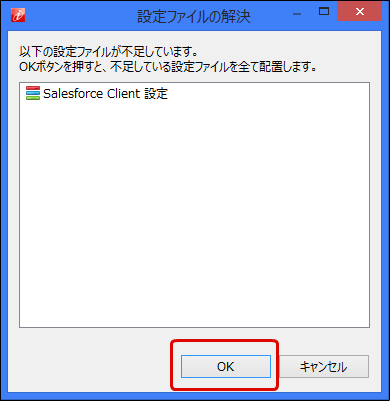
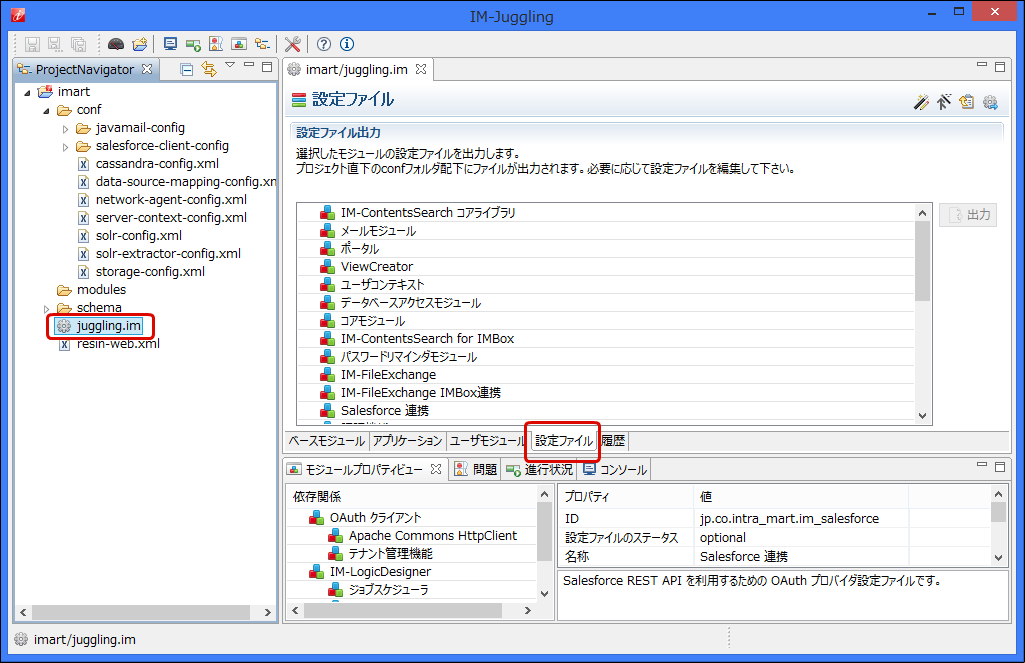
Salesforce 連携 、OAuth クライアントを選択した際、画面上部にエラーメッセージ「設定ファイルが存在しません(Salesforce Client 設定)」が表示されている場合、エラーメッセージリンクをクリックして、設定ファイルの解決より設定ファイルをプロジェクトに配置してください。
5.2. 設定ファイルの編集
Salesforce 連携 を利用するための設定ファイルを編集します。
設定ファイルの詳細については「設定ファイルリファレンス」-「設定ファイルリファレンス - Salesforceクライアントの設定」を参照してください。
Salesforce 連携 では、Salesforce からアクセストークンを取得する際、下記3種類の認証タイプを設定できます。
利用する認証タイプに応じて設定ファイルを編集してください。(利用しない認証タイプの設定を実施する必要はありません。)
コラム
各認証タイプは、Salesforce の下記OAuth 2.0 認証フローを利用してアクセストークンを取得します。
Salesforce では、「OAuth 2.0 Web サーバ認証フロー」(認証タイプ「oauth-client」)の利用を推奨しています。
詳細は、Salesforce の以下のドキュメントを参照してください。
5.2.1. 認証タイプ「oauth-client」を利用する場合
認証タイプ「oauth-client」を利用して Salesforce 連携 を行う為の設定を行います。
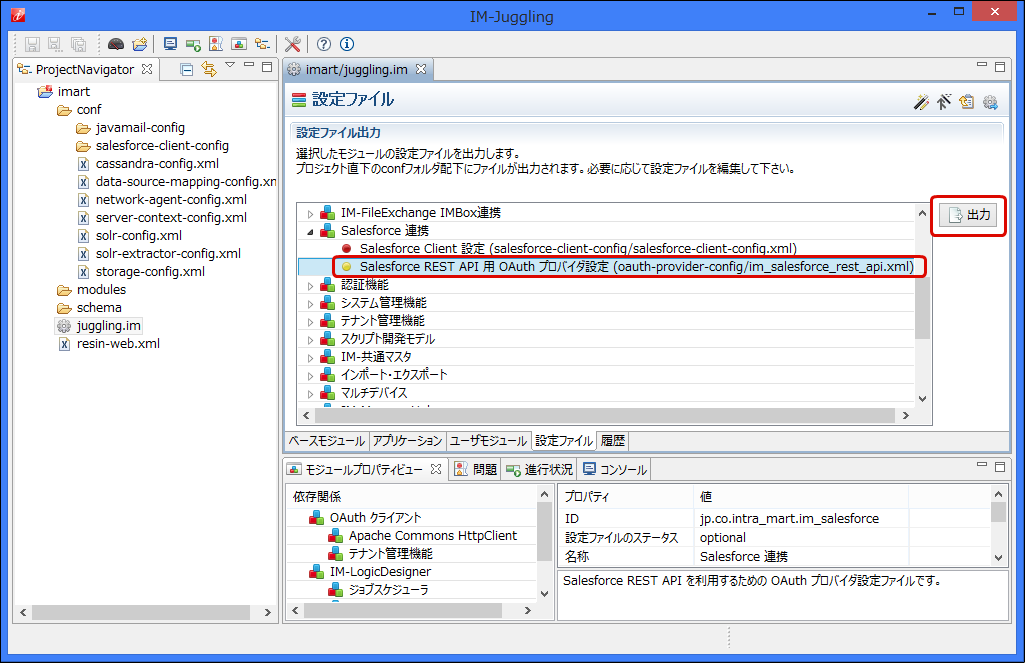
認証タイプ「oauth-client」を利用する場合、「設定ファイルリファレンス - Salesforceクライアントの設定」の他に「プロバイダ設定」を実施する必要があります。
Salesforce 連携 モジュールのSalesforce REST API 用 OAuth プロバイダ設定(oauth-provider-config/im_salesforce_rest_api.xml)を選択し、出力ボタンをクリックします。
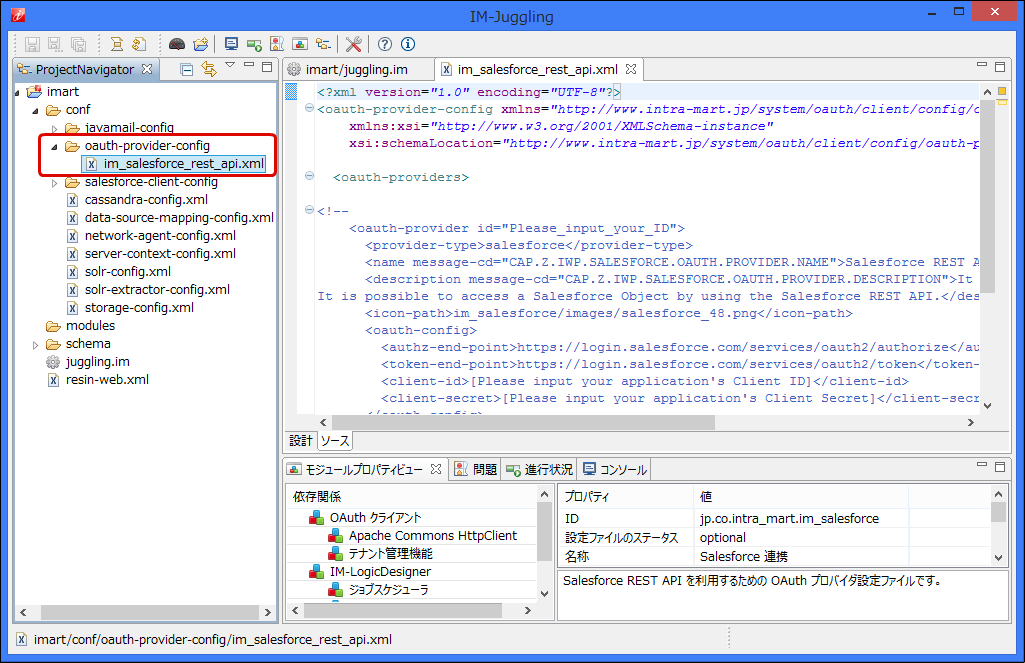 <?xml version="1.0" encoding="UTF-8"?> <oauth-provider-config xmlns="http://www.intra-mart.jp/system/oauth/client/config/oauth-provider-config" xmlns:xsi="http://www.w3.org/2001/XMLSchema-instance" xsi:schemaLocation="http://www.intra-mart.jp/system/oauth/client/config/oauth-provider-config ../schema/oauth-provider-config.xsd "> <oauth-providers> <!-- <oauth-provider id="Please_input_your_ID"> <provider-type>salesforce</provider-type> <name message-cd="CAP.Z.IWP.SALESFORCE.OAUTH.PROVIDER.NAME">Salesforce REST API</name> <description message-cd="CAP.Z.IWP.SALESFORCE.OAUTH.PROVIDER.DESCRIPTION">It is allow the use of the Salesforce REST API. It is possible to access a Salesforce Object by using the Salesforce REST API.</description> <icon-path>im_salesforce/images/salesforce_48.png</icon-path> <oauth-config> <authz-end-point>https://login.salesforce.com/services/oauth2/authorize</authz-end-point> <token-end-point>https://login.salesforce.com/services/oauth2/token</token-end-point> <client-id>[Please input your application's Client ID]</client-id> <client-secret>[Please input your application's Client Secret]</client-secret> </oauth-config> <extra-config> <parameter name="timeout-minutes">[Please input your Salesforce session timeout value (Unit: minutes)]</parameter> </extra-config> </oauth-provider> --> </oauth-providers> </oauth-provider-config>
コラム
以下のように intra-mart Accel Platform の 対象のテナントIDを指定することも可能です。テナントIDは半角スペースで区切って記載してください。<oauth-provider id="yourcompany.salesforce.com" target-tenant="default secondary"> ・・・ </oauth-provider>
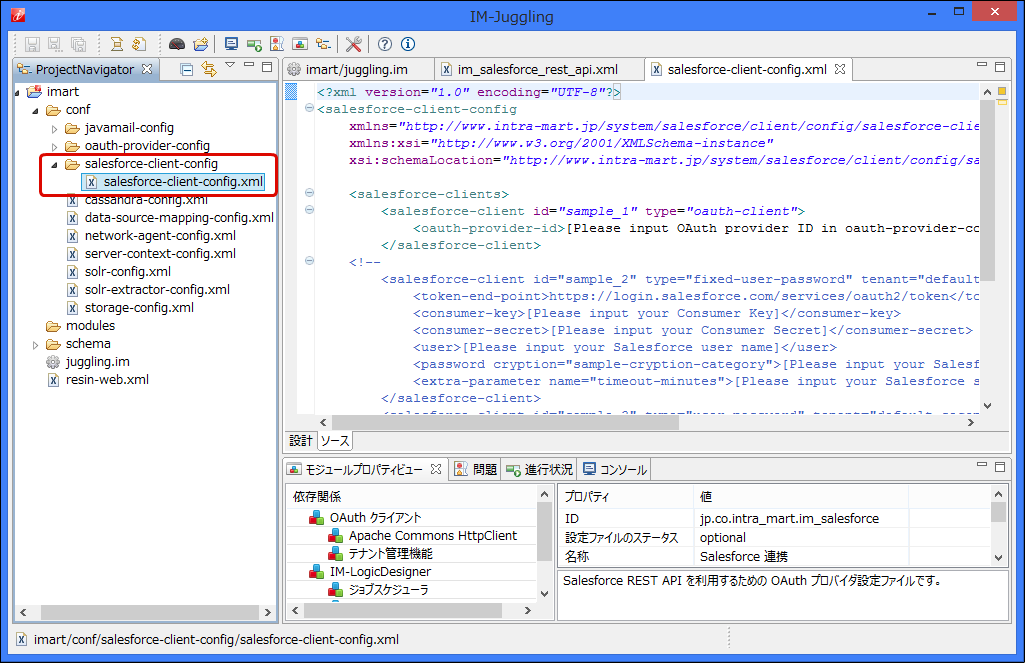 <?xml version="1.0" encoding="UTF-8"?> <salesforce-client-config xmlns="http://www.intra-mart.jp/system/salesforce/client/config/salesforce-client-config" xmlns:xsi="http://www.w3.org/2001/XMLSchema-instance" xsi:schemaLocation="http://www.intra-mart.jp/system/salesforce/client/config/salesforce-client-config ../schema/salesforce-client-config.xsd"> <salesforce-clients> <salesforce-client id="sample_1" type="oauth-client"> <oauth-provider-id>[Please input OAuth provider ID in oauth-provider-config]</oauth-provider-id> </salesforce-client> <!-- <salesforce-client id="sample_2" type="fixed-user-password" tenant="default"> <token-end-point>https://login.salesforce.com/services/oauth2/token</token-end-point> <consumer-key>[Please input your Consumer Key]</consumer-key> <consumer-secret>[Please input your Consumer Secret]</consumer-secret> <user>[Please input your Salesforce user name]</user> <password cryption="sample-cryption-category">[Please input your Salesforce user password]</password> <extra-parameter name="timeout-minutes">[Please input your Salesforce session timeout value (Unit: minutes)]</extra-parameter> </salesforce-client> <salesforce-client id="sample_3" type="user-password" tenant="default secondary"> <token-end-point>https://login.salesforce.com/services/oauth2/token</token-end-point> <consumer-key>[Please input your Consumer Key]</consumer-key> <consumer-secret cryption="sample-cryption-category">[Please input your Consumer Secret]</consumer-secret> <user-password-resolver>[Please input fully qualified class name which class is implements UserPasswordResolver]</user-password-resolver> <extra-parameter name="timeout-minutes">[Please input your Salesforce session timeout value (Unit: minutes)]</extra-parameter> <extra-parameter name="sample_key">sample_value</extra-parameter> </salesforce-client> --> </salesforce-clients> </salesforce-client-config>
コラム
以下のように intra-mart Accel Platform の 対象のテナントIDを指定することも可能です。テナントIDは半角スペースで区切って記載してください。<salesforce-client id="salesforce_oauth" type="oauth-client" tenant="default secondary"> ・・・ </salesforce-client>
5.2.2. 認証タイプ「fixed-user-password」を利用する場合
認証タイプ「fixed-user-password」を利用して Salesforce 連携 を行う為の設定を行います。
注意
パスワード文字列を暗号化するためのツールは提供されません。Java API CryptionUtil を利用して、指定したカテゴリで暗号化するプログラムを作成する必要があります。Java API CryptionUtil の詳細は「CryptionUtil APIドキュメント」を参照してください。注意
Salesforce の API を利用する際は、 Salesforce が発行するセキュリティトークンを利用して Salesforce にログインする必要があります。例えば、ユーザのパスワードが myPassword で、セキュリティトークンが XXXXXXXXXX の場合は、パスワード値に myPasswordXXXXXXXXXX を指定する必要があります。<salesforce-client id="salesforce_fixed" type="fixed-user-password"> ・・・ <password>myPasswordXXXXXXXXXX</password> ・・・ </salesforce-client>セキュリティトークンの詳細は、以下の Salesforce オンラインヘルプを参照してください。
注意
パスワード文字列を暗号化するためのツールは提供されません。Java API CryptionUtil を利用して、指定したカテゴリで暗号化するプログラムを作成する必要があります。Java API CryptionUtil の詳細は「CryptionUtil APIドキュメント」を参照してください。「extra-parameter」の「name」属性 ”timeout-minutes” を定義して、「タイムアウト値の設定」で設定したタイムアウト値(分)を指定してください。
<salesforce-client id="salesforce_fixed" type="fixed-user-password">
   ・・・
   <extra-parameter name="timeout-minutes">60</extra-parameter>
   ・・・
</salesforce-client>
5.2.3. 認証タイプ「user-password」を利用する場合
認証タイプ「user-password」を利用して Salesforce 連携 を行う為の設定を行います。
コラム
「user-password-resolver」を省略した場合は、「UserPasswordResolverImplForPasswordCredentialsGrant」が利用されます。「UserPasswordResolverImplForPasswordCredentialsGrant」は、intra-mart Accel Platform のログインユーザのユーザコードとパスワードを返却します。注意
intra-mart Accel Platform のパスワード保存方式に「ハッシュ化」を利用している場合、デフォルト値「UserPasswordResolverImplForPasswordCredentialsGrant」は利用できません。(理由:平文パスワードを取得できないため)以下の代替案を検討してください。
注意
以下の全ての条件に該当する場合、デフォルト値「UserPasswordResolverImplForPasswordCredentialsGrant」は利用できません。(理由:「UserPasswordResolverImplForPasswordCredentialsGrant」は、Salesforceのセキュリティトークンを付与したパスワードを返却しないため)
「extra-parameter」の「name」属性 ”timeout-minutes” を定義して、「タイムアウト値の設定」で設定したタイムアウト値(分)を指定してください。
<salesforce-client id="salesforce_user_password" type="user-password">
   ・・・
   <extra-parameter name="timeout-minutes">60</extra-parameter>
   ・・・
</salesforce-client>
5.2.4. Salesforce クライアント設定ファイルの確認
以下は、Salesforce クライアント設定ファイルに3種類の認証タイプを定義した場合の例です。
<?xml version="1.0" encoding="UTF-8"?>
<salesforce-client-config
    xmlns="http://www.intra-mart.jp/system/salesforce/client/config/salesforce-client-config"
    xmlns:xsi="http://www.w3.org/2001/XMLSchema-instance"
    xsi:schemaLocation="http://www.intra-mart.jp/system/salesforce/client/config/salesforce-client-config ../schema/salesforce-client-config.xsd">

    <salesforce-clients>

        <!-- 認証タイプ「oauth-client」を利用する場合 -->
        <salesforce-client id="salesforce_oauth" type="oauth-client">
            <oauth-provider-id>yourcompany.salesforce.com</oauth-provider-id>
        </salesforce-client>

        <!-- 認証タイプ「fixed-user-password」を利用する場合 -->
        <salesforce-client id="salesforce_fixed" type="fixed-user-password" tenant="default">
            <token-end-point>https://login.salesforce.com/services/oauth2/token</token-end-point>
            <consumer-key>3MVG9ZL0ppGP5UrB0UWy89gD9mcHOhv1LOkliPQg.RPuiPisQQl0kDOvLNOeCg1pQwatADMMAfiaaOcdIMsn8</consumer-key>
            <consumer-secret cryption="sample-cryption-category">Dl2WiW+7HXcIv1hTt37GY7tTr1KCPVFJ</consumer-secret>
            <user>aoyagi@intra-mart.jp</user>
            <password cryption="sample-cryption-category">cNnnOz2rYGhyMBmERC9cfA==</password>
            <extra-parameter name="timeout-minutes">60</extra-parameter>
        </salesforce-client>

        <!-- 認証タイプ「user-password」を利用する場合 -->
        <salesforce-client id="salesforce_user_password" type="user-password" tenant="default secondary">
            <token-end-point>https://login.salesforce.com/services/oauth2/token</token-end-point>
            <consumer-key>3MVG9ZL0ppGP5UrB0UWy89gD9mcHOhv1LOkliPQg.RPuiPisQQl0kDOvLNOeCg1pQwatADMMAfiaaOcdIMsn8</consumer-key>
            <consumer-secret>6021527967626201664</consumer-secret>
            <user-password-resolver>jp.co.intra_mart.system.salesforce.client.impl.UserPasswordResolverImplForPasswordCredentialsGrant</user-password-resolver>
            <extra-parameter name="timeout-minutes">60</extra-parameter>
        </salesforce-client>

    </salesforce-clients>

</salesforce-client-config>
5.3. テナント環境セットアップ
5.4. WebSphere Application Server 利用時の設定
5.4.1. Java VM引数に -Dhttps.protocols=TLSv1.2 を追加する
IBM JDK 7 を利用している場合、Salesforce への接続にデフォルトで TLS 1.0 を使用します。
Salesforce への接続には、TLS 1.1以降を使用する必要があります。
その為、「intra-mart Accel Platform セットアップガイド (WebSphere編)」-「Java VM引数の設定」を参照して、以下の汎用 JVM 引数を設定に追加してください。
5.4.2. VeriSign Class 3 Public PCA - Generation 5 (G5) を追加する
Web Application Server に WebSphere Application Server を利用する場合、SSL 証明書の認証問題が発生します。
Salesforce を利用する場合の問題について
解決方法として配布されている証明書を WebSphere Application Server のトラストストアに追加する必要があります。
WebSphere Application Server 8.5.5 の場合の例を説明します。
注意
Salesforce 連携 機能は、Salesforce のサービスを利用しているため、予告無く仕様(必要な SSL 証明書)が変更される場合があります。
本追加設定を行っても SSL 通信のエラーが発生する場合は、エラー内容に従い、適切な SSL 証明書を追加してください。
以下のURLから「VeriSign Class 3 Public PCA - Generation 5 (G5)」証明書ファイルをダウンロードして、WebSphere Application Server 内の任意のディレクトリに配置します。
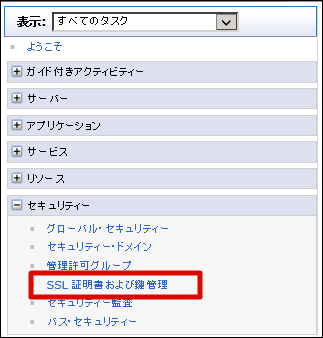
メニューから[セキュリティー]-[SSL 証明書および鍵管理]を選択します。
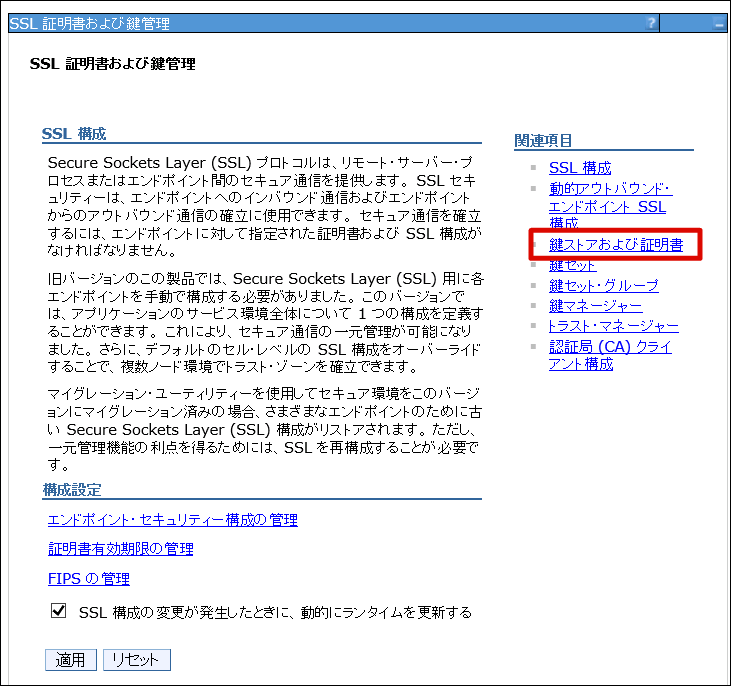
[鍵ストアおよび証明書]リンクをクリックします。
[NodeDefaultTrustStore]リンクをクリックします。

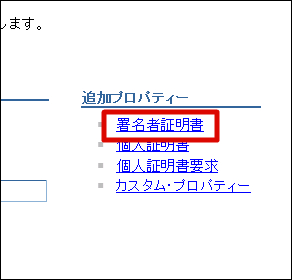
[署名者証明書]リンクをクリックします。
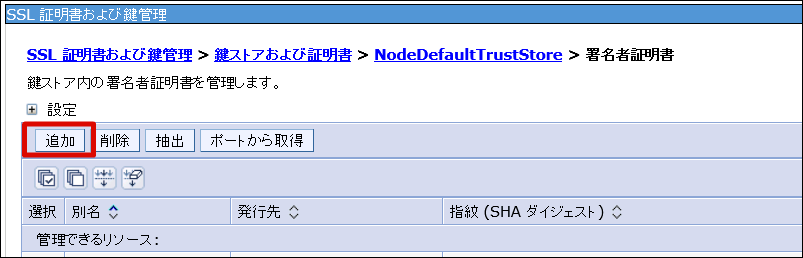
[追加]ボタンをクリックします。
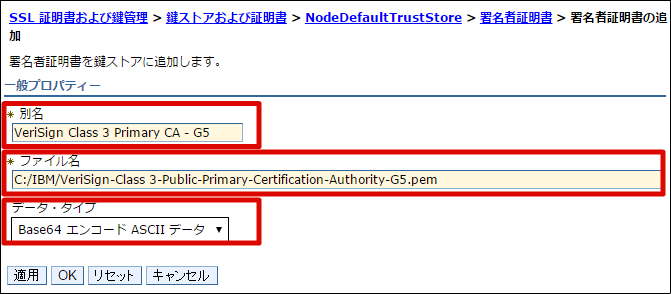
- 以下の項目を入力・選択し、[OK]をクリックします。別名に任意の文字列を入力します。例: 「VeriSign Class 3 Public PCA」ファイル名に、ダウンロードした証明書ファイルへのパスを入力します。データ・タイプ 「Base64 エンコード ASCII データ」を選択します。
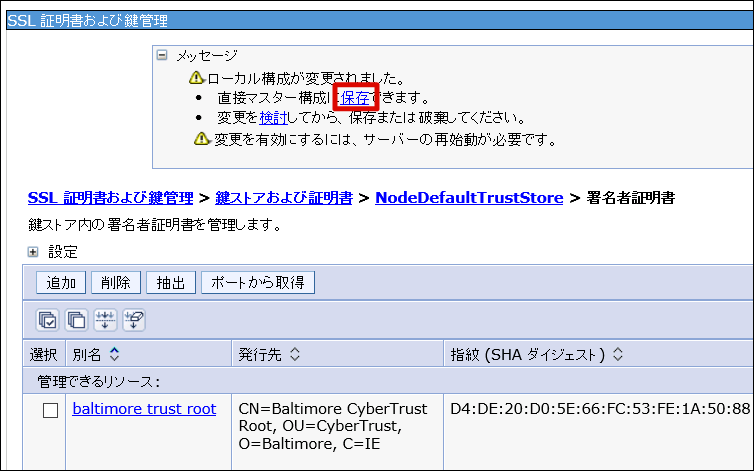
[保存]をクリックします。
WebSphere Application Server を再起動することで、設定が反映されます。